 Prep:
Prep:
 2. wrap your yarn around the inside of the next hill,
  and then back toward your slip knot (in front of hill) and then to the back again
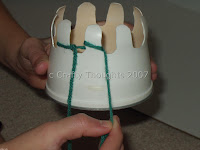 do the same for the rest of the hills.
  4. Assuming you are right handed, keep your yarn in your right hand, pull it aside, and with your left hand, pull your bottom yarn strand over the top of your hill and release.
 5. Continue steps 3 and 4 until your scarf reaches your desired length.
 1. Once your scarf is long enough, cut your yarn to leave a tail of at least 6-8 in. (Complete your stitches so that there is only one strand of yarn on each hill.
2. Take the strand from your last completed hill and raise it over the top and onto the hill to its left. You will now have one empty hill and one hill with two strands. Continue this step until the scarf is off the container.
3. Run your tail through the stitches to make a knot and keep your scarf from unraveling! You can do the same with your starter tail as well so that both ends are the same...that is up to you.
4. Wear as is or add fringe to the ends.

Fringe:
There are several different ways to do fringe. I still haven't decided on what I like best!
Suggestions: a) Cut 10-20 10in. strands, fold in half, thread through the bottom stitches and pass your strand ends through the fold, pull to tighten. b.) Cut 10 -12 10in. strands - thread them through one or two stitches, make sure strand ends are even and use another piece of yarn to make a tie in the middle.
Note: I just received my Joanns circular - they are having a 4 day sale 1/12 - 1/15 and they are advertising Fun Fur yarn 10 for $10 - that is an awesome deal - the regular price is $3.29 - 4.99!!!!! Other yarns are on sale as well - some brands/styles 2/$5 and others 2/$10
Have fun - happy scarving!!!
(If you have any questions please feel free to send me an email - a link is on the right toward the top of the page! )


4 comments:
saw your post on SCS so i'm checking it out. Gotta tell you i think this is sooo Kewl!
Gonna get some yarn and soup tom. Then the kidlets and i will be scarving.
Thanks for the tutorial.
stampinani
it's a homemade knifty knitter! cool beans
My grandson wants to learn to knit or Chrochet. This looks like a fun project to do with him. TFS I'm a sure we will have lots of fun.
Grandmascraps
this is loom knitting. I love that you used something you would normally toss to make your loom. Very creative.
Post a Comment