Wednesday, January 31, 2007

Much better...

in my opinion, anyway!!! This is my second Target mailbox - this one is for DD#1...I decided to streamline my process a little bit and this one went much quicker than yesterdays!!!


I decided to punch out my hearts instead of heat embossing them...embossing is not one of my favorite techniques!! I used my red foil paper and my sizzix and I'm very happy with outcome...everything is pretty much the same except for the two little hearts on the postage punches...I didn't have a hand punch with the just the right size of a heart but...my sizzix gingerbread man did!!! I used his "buttons" for my postage hearts and I added dd's name to the front...I decided since I liked this closure better than the one I did yesterday, that I would change dd'#2's box to match...and I did (but with her name on the front ;-) ).

DH actually said he liked the first box last night and asked what was going in them? Well, I didn't really have an answer and that got me to thinking...yes, they can be a decoration but they would only be in "use" for the one day...but then again, the valentines I made for the girls won't come anywhere near fitting inside this cute little box so...this morning I came up with the idea of putting some kind of treat in the box everyday from today until the "big" day!! It could be a little card I make for them, a little piece of candy, etc... sound good? Works for me...now I just have to remember to do it!!!! :-)

Moving right along...today is Wednesday and you know what that means...a sketch challenge on SCS... found here:

http://www.splitcoaststampers.com/forums/showthread.php?t=220126

I decided to once again combine the sketch with the color challenge for the week...


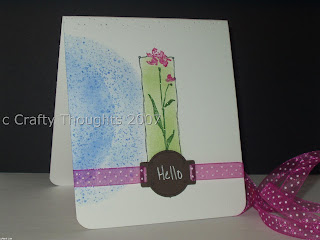
I used Bud Basics (SU!) - I stamped on watercolor paper with black stazon ink and then water colored using the ink that gets smeared on the top of the ink pad...I stamped, colored and cut three blossoms from scrap watercolor paper, ran them thru my Xyron and the poured dazzling diamonds on them. Don't you just love that sparkle?? I stitched the top and bottom of the middle layer and roughed it up with my scissors. The sentiment slide was inspired by Cindy Haffner over at SCS - just before I finished my card I saw her post for the challenge and the way she did her sentiment looked perfect for my card...I was debating how to proceed with it at the time...good thing I checked my computer!!! I ran some satin ribbon behind the slide and then folded the ends over and adhered them to the back. Even after I adhered the sentiment, I still thought the top looked a little blah so I added a portion of a word window punch and added some jewels! I also pierced the card above and below the middle layer and on the sentiment slide (Cuttlebug die)...

Time for some work - hopefully I will have time to play with the sketch again later...

See you soon...

and....I'm back! I decided to edit this post rather than starting a new post - not sure which way is best...if anyone has any feedback on which they prefer...let me know!!

This another for today's sketch challenge...I decided to just stamp the Inky Antics turtles head - I used the sizzlit tag set because I felt the size would be perfect...The background is another cuttlebug embossing folder...I went over the top with a dark green ink pad...I outlined the turtles hair, flower and hello with my stardust pen.

I also gave the turtle google eyes! I had started off with the intention of doing the card in yellow and green but I don't seem to have any yellows that were right or that I like! I'll have to order some SU! packs - I'm sure they have one that will work!!! The turtle is water colored and I masked him/her? to sponge on the blue sky...I think it's cute, but the more I look at it I realize that maybe I used one too many colors of paper...what do you think?

Hope your week is going along well...can you believe its February already?! WOW!

See you soon...


Tuesday, January 30, 2007

Another day, another challenge!

Tuesday is the color challenge over at SCS found here:

First, I decided to incorporate today's colors with yesterdays challenge to make a shadow box card...this one is for a friend of dd's that is turning 8...


These are fun cards!!! On this one I used my birthday embossing folder and my Inky Antics turtle! I colored the turtle with markers and then masked him so that I could sponge the sky and grass...I made some little grass tufts with my marker as well. In order to incorporate today's colors I used what was left over from a scallop punch and adhered that to the inside of the card front. The white flowers are cuttlebug dies and the charm is from OTC. I decided to try a transparency on the inside of the card, but just on the side - the sentiment is stamped in blue stazon ink...just for something a little bit different. The balloon is popped and covered with dazzling diamonds - his flower is covered with dd's as well.


My second try at the the color challenge is a thinking of you card that I think I will send to dh's 91 year old grandmother...just to say...we're thinking of her since she lives a few hours away and doesn't get to see family very much.


I stamped the card front with paisley and had a devil of a time trying to figure out what image to use as the focal point! With a room full of stamps you would think that would not be a problem!

I finally decided to use Watercolor garden 2 - the smaller flowers are rock -n- rolled! I stamped my flower in teal and then rolled the edges in navy...the centers are colored with my Stardust pen as well as the dark areas of the tulips although it is hard to see in the photo. The sentiment is from Sincere Salutations (SU!)...I pierced the bottom and upper corners...and the black scallop.

That's it for day...I'm pooped and those darn kids have to eat again!!! ;-) Good thing they're cute!!!

See you soon...


What a project!!

I keep telling myself lately to keep things simple, especially in my paper crafts projects...and although I tried to do that with this mailbox project it took me FOREVER!!!!! I keep flip flopping between thinking this is too busy and thinking it looks too simple!! I'm never happy, I guess!!! I'm my own worst critic!!
This is one of the infamous Target $1 spot mailboxes...I made this one for DD#2 since she is always left until last and will make the next one for DD#1 when I have a few spare hours!! ;-)


side view:
back view: flag view:
I used paper from a Provo Craft slab for seasons and celebrations...it is a more cutesy pack than most of their other slabs...I used two sided tape to adhere the paper to the mail box. I used the same, but thinner version, of the tape to adhere the ribbon or to make things short - to adhere everything!!! The heart on the side (main) view is a sizzix heart, cut from white paper and chipboard, adhered together and then stamped in red craft ink...I then heat embossed it with red powder...the hearts on the front view and back view are stamped with red craft ink using the heart from mini messages (SU!) and heat embossed with red powder as well. I added 39 in white gel pen (black marker for the rear) and cut them with a postage stamp punch. The flag has the same sizzix heart as the side, mounted on chipboard except that the red is velvet ribbon.
The big change I made to the box is that I used my Crop-a-dile to cut a hole in the very top of the box...wow does that thing cut through things like butter!!! I then threaded some ribbon through, made a knot on the inside and then attached the other end to another heart mounted on chipboard...I added some velcro to the heart and the box and that is my closure! The "A" for dd#2 is also mounted on chipboard and is from the Sizzix lollipop alpha.
So there you have it, my first mailbox. I haven't decided if dd#1 will get the same or not...I think I need to think about that one! In the meantime, I need to make a kids b-day card and I've been itching to make another shadow box card - those things are fun and COOL!!!!!
See you soon...

Monday, January 29, 2007

Another try...

these shadow box cards are FUN!! I think I need to start jotting down the ideas that pop into my head for them - they have huge possibilities!!! Here is my second try for today...


This adorable stamp is from DRS designs...this is the first time I've used it! The card front is stamped in canvas (I was going for the tent/camping texture!) and the white background is sponged with several blues...the fire is a sizzix die, cut in brown and white - I sponged the white with yellow and orange...the marshmallows are "popped" although it is hard to see in the photo and covered with dazzling diamonds. I ran them through my xyron to make sure they were all good and sticky! The heart is felt and I stitched the X's with DMC floss. I used my slit punch to make the scallop canopy and my snap stamps for the sentiment (you make me melt). Not sure if the sentiment just came to me or if I saw it somewhere recently...I cruise the SCS galleries constantly...so much I'm surprised I don't dream about them!! The hearts over the marshmallows are a hand punch and I used red foil paper.

Now I'm thinking that DH just might get two Valentines this year!!!

See you soon...

My First...

shadow box card that is!!! Today's technique challenge on SCS found here:
was to make shadow box cards - they are very quick and easy and the excellent tutorial is found here:
My first thought when I saw the tutorial was to make a Valentines card and this fish from Toucan of My Love (SU!) came to mind. I used my embossing folders to emboss the blue with bubbles and the green with swirls...I stamped my fish on pink and then pressed it into Versamark and embossed with clear powder and some dazzling diamonds...sorry about the glare, it was hard to get a photo to show the actual shadow box...the fish is raised on left over stamp rubber and I outlined some of the bubbles around the fish with my Stardust pen. I punched the front hole with my giga scallop punch and used my white gel pen to add the dots around the circle...the "bubble hearts" are beads and I used the window punch for the sentiment...the sentiment was a little too long for the actual punch so I had to make my punch out a little bit longer...I basically just cut my paper the width of the punch...slid one end in, punched, took it out and slid the end in, punched, took it out. The heart below the sentiment is a brad.
The overall size of the card seems a little small to me...I may try to fiddle with the next one and see if I can make it just a little bit bigger...

Something new...

as I mentioned in my last post, I wanted to try something other than the daily challenges on SCS, so here it is...a gift for my friend Deb...for her desk at work...

First is a coaster calendar...I promised to make her a calendar last year and never got around to it - better late than never right?! I ordered the mini calendar from Impress Rubber Stamps.


and next is a coaster box that has been all the rage over at SCS...


you can find an awesome tutorial here:
I changed mine up a little though...rather than using modpodge (because I don't have any) I first decided to water down some glue and adhered the paper for the calendar to the coaster with that...it caused the coaster to warp a bit so I decided for the box, that I would use some two sided tape along the edges and corners and that worked for me! It is a little busy (my family made fun of me for the remainder of the night after showing them) and I think for the next one (not just b/c they made fun of me, but in the interest of saving time) I will tone it down a bit!
I used paper from one of the Provo Craft slabs, on two sides I used the SU! slit punch to make scallop borders and on the other two sides I hand sewed a strip in the middle by first piercing my paper and then sewing. Two sides have silk flowers with prima and pearl brad centers. One side has a sentiment from You Are My Sunshine(retired - SU!) with "friend" highlighted with a watercolor pencil and the other has a tag with a "D" sticker...tag was made using my MM tag maker (that Deb gave me!)... The sentiment is inside a Sizzix bookplate that I cut out of tin that I salvaged from our local newspaper printer...
The calendar is also stitched and the prima centers are cut from a beaded ribbon I've had in my stash for quite a while...I also adhered some round magnets on the back so she could stick it to a file cabinet...
I finished the bottom a little bit differently than the tutorial...I do not have the super duper glue Taylor suggests, but I do have Crystal Effects so I used that...I couldn't get the box to line up perfectly on the bottom coaster so I turned the box over and pushed the bottom into the box until it met the ribbon for the first holes and then ran CE around the entire area where the box and bottom meet and I did the same on the inside...we'll see how it holds up!!
So, there you have it, I can do things other than challenges!!! ;- )
Although the technique challenge for today is shadow box cards - I've never made one so I'll have to give that a whirl - looks like it might make a great Valentine and I need a baptism card too...hmnn...off to the drawing table!!
Hope you had a great weekend and look forward to a great week ahead!
See you soon...

Friday, January 26, 2007

I couldn't resist...

just one more challenge for the week! Friday is the limited supply challenge on SCS found here:
and as you can see we have reached #100!! Wow!
So here is my contribution!!! Isn't she pretty?!!! Just kidding! This will be my valentine for DH...if you read my "tag" you would probably figure out by one of the items that we are Grateful Dead fans and DH is currently in a Jerry Garcia cover band...

I purchased this stamp several years ago from my local stamp store - it is by Stamp Francisco...the band DH was in at that time would print up postcards of upcoming shows and I would stamp them with this stamp! Anywho, back to the present...when I saw that the challenge was black and white with just one other color, this was the first thing that came to mind. I'm quite pleased with the end result although there was quite a bit of trial and error getting there! After contemplating several sketches/layouts, I decided to keep it simple since the stamp itself is quite busy. I embossed the image and sentiment, roughed up the edges of the red and black that the image is matted on, used a cotton ball dipped in black ink around the red edge to give it a distressed look...I even added a velvet photo corner...hand cut...from some leftover black velvet ribbon from who knows where...I'll have to see where I can get more black velvet - I like it!!! I added some black brads on top and used my 1/4 in casual snap stamps for the sentiment...Be Mine...

And now off to "work" on a non-challenge project...although I have a feeling this project may turn out to be quite a challenge...check back soon to see the outcome!!! Oh, and I guess I should squeeze some real work in too... ;-)

See you soon...

Thursday, January 25, 2007

Fourth one is a charm!!

Well, after numerous attempts at this weeks color and sketch challenges, I finally made one I like!! The color combo found here:
http://www.splitcoaststampers.com/forums/showthread.php?t=217585 was tough for me for some reason...I like the colors but had a hard time finding a balance I was happy with...my first attempt was using one of my new Rhonna Farrer $1 stamps from Joanns...


No, the bird is not in the jar trying to get out...it is actually supposed to look like it is painted on it...when I was a kid my mom dabbled in tole painting...mostly on painted metal containers...but since I was trying to stay within the color challenge I couldn't very well replicate it exactly...the more I look at this card, the more I realize how silly it looks...oh well.

My next attempt was to combine the color with the sketch challenge found here:
http://www.splitcoaststampers.com/forums/showthread.php?t=217861


Contrary to the last card, the more I look at this one, the more it grows on me...this another Rhonna $1 stamp...the sentiment is a Michaels $1 stamp...I stamped the images in blue craft and then heat embossed them...I used my white gel pen to color in the "gaps" of the flower outline...added some jewels of course...maybe that is what the bird needed???? just kidding!!

This next one is another version of the sketch with my own color combo!

The hearts are sizzix and are mounted on chipboard...the sentiment is a wood stamp found at Joanns for a $1...(don't you just love $1 stamps?! I guess I do!!!) Added some jewels and a hat pin to this one...outlined with my white gel pen and stardust pen, although its hard to see the stardust in the photo...

My final attempt I deemed somewhat of a success...in my opinion anyway...this was for the ways to use it challenge to use background stamps, found here:
http://www.splitcoaststampers.com/forums/showthread.php?t=218215


I stamped paisley on my main background and embossed the top half with the script cuttlebug folder...The art of life is my main stamp image...I embossed script on the lighter blue and the cuttlebug dots on the burgundy...I decided to set them askew just for fun! I tied hemp around the main image and ran the ends through the center of a prima, knotted the two strands and then made a knot at each end. I ran ribbon around the top with a knot on the side...and added two window punch pieces with a large pewter brad...I also pierced on both sides and outline the holes with black marker, but it's a little hard to see...
So, there you have it...my week of cards!! I have some other projects on my to do list so I hope to get those done soon...I'm thinking it might be nice to do something other than challenges for a change!!!
See you soon...


Wednesday, January 24, 2007

I was tagged...

So nearly everyone over on SCS has been talking about tagging and who hasn't been tagged lately...I was beginning to feel a little left out and then Alex tagged me (thanks!)...so here's the info I guess I am supposed to share!!!

A - Available or Taken: Taken
B - Best Friend: guy = dh, girl = Deb
C -Cake or Pie: chocolate cake with buttercream icing!!!
D - Drink of Choice: coffee or Smirnoff Ice - depending on the time of day!!
E - Essential item you use everyday: Computer
F - Favorite Color: Cranberry
G - Gummy Bears or Worms: Gummy Bears
H - Hometown: Fairfield County, CT
I - Indulgence: Starbucks
J - January or February: Febuary - it means we are that much closer to Spring!
K - Kids & Names: J - 10, A - 7
L - Life is incomplete without?: my family and my hobbies
M - Marriage Date: May 16
N - Number of Siblings: 2 brothers
O - Oranges or Apples: oranges
P - Phobias or Fears: not a big fan of flying...unless it's to Disney!!
Q - Fave Quote: hmnnn - one that should be my favorite and personal motto (I'm working on it!) by Thoreau - Simplify, Simplify, Simplify...
R - Reason to Smile: I'm healthy (as far as I know!)
S - Season: Spring/Fall - can't decide
T - Tag 3 or 4 People: Alex (Sillybird) in return for tagging me! Don't know anyone else that has not been tagged already!
U - Unknown fact about me: I was on stage with The Grateful Dead in Foxboro in the early 90's - just an arms length away from Jerry...if you want to know the rest of the story, you'll have to ask me, but it may not be as interesting as you think!!!
V - Vegetable you don't like: broccolli!
W - Worst Habit: interrupting people
X - X-rays: teeth, chest
Y - Your Fave Food: Nachos or anything cheesy really!
Z - Zodiac Sign: Libra - crave balance...can you tell in my cards?

So, there you have it!
I made some cards today for the color and sketch challenges - the ones that I finished, I'm not too thrilled with but since I posted them on SCS, I will post them here too...but not until tomorrow...running out of computer time for today!!! Do your kids have to eat too??? Everyday they want something!!!! geesh! ;-)

See you soon...

Monday, January 22, 2007

We have a winner!!!!

Well, it's just past 8p (est) on Monday, 1/22/07 and dd#1 has picked a comment out of a hat....and the winner of the goodies in my previous post is...
doverdi and her earliest Valentines Day memory is this:
"My earliest Valentine's memory would have to be while I was in grade school. I remember how exciting it was to sit at the table and write out my valentine's chosing who would get each one. Then going to school and having our exchange. It was so exciting to have all these special cards to bring home."

All I need now doverdi is your snail mail address and I will put these goodies in the mail to you...just send me an email through the button on the right --->

I plan on having another giveaway in time for St. Patty's day so be sure to keep checking back!!!

And now, back to business!!!!

Monday on SCS is the Technique Lovers challenge and today was #100 and boy was it a challenge - 5 in fact...I only had time for 4 but with my schedule that is quite an accomplishment!!
The first challenge was to recreate a card in the catty using different colors so since Loving Hearts was on my desk, I chose to case the card on page 26...it was a much darker card and I brightened it up!!! I also added a jewel (of course) in the center of the small flower rather than leaving it blank as SU! did.


For my second card, I combined the second and third challenges to color block and doodle...lazy stamper that I am, I chose to use the same colors since they were out and added black for balance! I love these stick kids by Me and My Big Ideas...I thought she looked like she was giving a big hug - hence the name of the card - big hug!! ;-)

The background stamps are an assortment of the current Michaels $1 stamps...the doodling came in around the frame outlining the focal image...I colored her in with watercolors and sponged the grass and sky...my latest thing to do!! Each color is pierced a little bit differently but it's hard to see in the photo...the white gel pen stitching around the outside brought it all together, I think.


And finally, I decided to give the kissing technique a whirl...but on a small scale!


This heart stamp was in a four pack that I stumbled across at Target a week or two ago...I inked my Paisley (SU!) background up with pink passion and then pressed the stamp on it, then my paper...I stamped paisley on each strip in the color of the strip...added a Michaels $1 sentiment from last year and pierced away!!! I also decided to traced the outline of the paisley on the middle strip with my Stardust pen...the hearts are popped on leftover stamp rubber and each is matted with one of the strip colors...

Have a great week...

See you soon...

Friday, January 19, 2007

It's time, it's time...

for a "blog candy" giveaway!!!! To celebrate over 6000 hits in just a couple of months and several subscribers and the fact that the holiday of hearts, known as Valentines Day is quickly approaching, I figured it was time for a giveaway to thank everyone who has made this blog what it is!!
So, without further ado...this is what you have to do!!! Leave a comment on this post and tell me your earliest Valentines Day memory by 8pm Monday night (1/22/07)...at that time, dds will pick a comment out of a hat and that person will win the above...what is the above? It is...two Snoopy valentine cards...an assortment of chipboard hearts - different sizes/shapes, some chipboard roses and an assortment of velvet hearts in different sizes/shapes and two colors - red and burgundy...

I'll go first...my earliest Valentines Day memory is when I was probably 6 years old and my Dad gave me a box of chocolates in one of those red heart boxes...I don't remember the candy, but I do remember that box, so red and shiny and to this day whenever I see those old style boxes (without SpongeBob or whatever other character is on them now!!) I'm brought back to that day...

so...what about you?

Very Versatile Verses...

the title of today's limited supply challenge on SCS, found here:

http://www.splitcoaststampers.com/forums/showthread.php?t=216031


This was a good challenge for me since I rarely use sentiments (other than one or two words) on the front of my cards. I used the colors from this weeks color challenge and attempted to incorporate the sketch for the week but I couldn't quite make it work so I did half the sketch! I also used watercolor paper (ways to use it challenge) for my sentiment. Whew! I watercolored two words with my perfect plum pad (the closest I have to pale plum) and I also used my new Cuttlebug flowers dies...the bottom scallop was inspired by Toy on SCS...that and the sentiment are raised on leftover stamp rubber...only the patterned paper and the flower in the back are actually on the card front. The front is stamped with swirls and blossoms in close to cocoa...I used my rectangle punch to cut notches for the cord to stay on the card. I pierced the top and side of the card as well. I outlined the sentiment and the scallop edges with my Stardust pen...the flower on the scallop is a Michaels $1 stamp - the heart is colored with the stardust pen too. Finally, I snipped off the top edges, snipped again and re-adhered just the corners for a different look.

See you soon...


Thursday, January 18, 2007

Just one more...

for tonight and the days challenge! I had this idea in my head and wanted to make sure I got it down!!

The theme for today (in addition to watercolor paper) for me was simple cards!!! I have had this frame stamp by Great Impressions for I don't know how many years now and this is the first time it has seen ink! I highlighted the little hearts around the frame with my Stardust pen. Snoopy is stamped on watercolor paper, colored and sponged! He is also raised on leftover stamp rubber. I added the three hearts and the rose - both are the new Michaels $1 stamps...so is the sentiment which is also highlighted in Stardust. Finally, I pierced the corners and bottom! The pink patterned paper is from a Provo Craft slab of 7x7 paper.
I think I like it... :-)

Welcome...

For today's ways to use it challenge on SCS found here:
http://www.splitcoaststampers.com/forums/showthread.php?t=215728
using watercolor paper...

This was inspired by Scoopy's recent post of a card for new neighbors...(find a link to her blog on the right)...I loved the simplicity of her card and was also reminded that we too have new neighbors!! So, I figured it was a good opportunity to participate in the challenge as well!
The image is a Michaels $1 stamp from spring/summer...I omitted the new home sentiment on the bottom...stamped it on watercolor paper in black ink and then water colored the image...I then masked the image and made another mask out of post-its for the outside "frame". I sponged green and blue and then hand painted in a tree and outlined that with fine black marker. The sentiment is 1/4 in snap stamps and the focal point is popped on left over stamp rubber. The background image is a vine stamp by Great Impressions and I outlined the twirlies with my Sakura Stardust pen.

Thanks for stopping by...check back soon for something special...want a clue? All the other kids are doing it, so why shouldn't I??!! ;-)

Wednesday, January 17, 2007

Cool Sketch...

Another for today's sketch challenge! I found this stamp, on sale, at Michaels...my first Snoopy stamp!!

Isn't he cool?!! The patterned paper was from a slab of pet paper I found at Walmart...it is what is left of a 12x12 piece...it was part of a disastrous project that had to be torn apart and put out of my mind and its misery!!! Don't you hate it when that happens...really puts a damper on your day...it does for me anyway...
I colored Joe (Snoopy) with watercolor pencils...I usually dip my brush in water and rub it along the side of the pencil tip rather than coloring and then adding water...I find that doing it this way, I don't have pencil lines and actually control my color better. He is standing on an oval that I stamped using a foam stamp...I really want one of those and when I found this cheapie one I figured I was all set but it is a little too big and being foam, it doesn't give the clean coverage I would prefer...sounds like I might need to check out Inky Antics...they have great images and ovals!!! I love my turtle...I'll have to bring him out of hiding again soon!
The card itself is stamped in close to cocoa with Canvas (SU!)...the "dog tags" are the key tags you find at the local office supply store...just took the ring out and added my grosgrain ribbon and brad. The tags are popped on leftover stamp rubber. I doodled lines around the outside edges of everything and added highlights on his glasses and nose with my Stardust pen...I love that thing! Could that take the place of jewels on my cards??? Probably not!!!

Thanks for checking in...
See you soon...

Just a reminder...

to keep smiling!!! For today's sketch challenge #107 on SCS, found here:
http://www.splitcoaststampers.com/forums/showthread.php?t=215348

This was the first thing that came to mind when I saw the sketch this am...The smiley (raised on a pop dot) and flower are from the groovy sizzlits set from Sizzix. I decided to punch the holes on the bottom and top corner after piercing the paper...the background is Paisley (SU!) in summer sun ink...I embossed print pattern (SU!) with clear powder after stamping with yellow pigment ink...I hand drew the smiley on the large brad! I corner rounded opposite corners. Almost everything is outlined in my Sakura Stardust pen...it is a very sparkly card in person, but when I tried to photograph it head on the glare would give you a headache!! All in all a fun card to make! Enjoy and don't forget to smile!!

As you can see I found a new"photo stand"...hopefully this will help improve my picture taking!! I found it at Michaels while looking for a frame for a stitchery I have almost completed after a few long years of working on it!!! I also stumbled across those Valentine $1 stamps everyone has been raving about. They had the regular stamps on sale too and I found a couple of Snoopy stamps that I couldn't pass up...yes, I purchased some of the Valentine ones too - in case you were wondering!!

See you soon...I'm hoping to fit another for this sketch challenge...we'll see!

Tuesday, January 16, 2007

Tuesday challenge...

For today's sketch challenge on SCS - found here:
http://www.splitcoaststampers.com/forums/showthread.php?t=215014
using pale plum, close to cocoa and sage shadow...as usual I did my best to match with what I do have...the sentiment is stamped with close to cocoa and the flower is perfect plum stamped off to make it lighter and look more like pale plum. The "plum" piece is a scrap of patterned pattern. The top and bottom are pierced...the focal point is stamped on SU! shimmery white paper and pierced as well.

The stamps are from SU! Art of Life...I added some embroidery floss and a couple of jewels! Simple and quick...oh, and the background is stamped in a soft sage with paisley (SU!). I roughed up the edges of the main sage piece and the brown piece behind the focal point. I had a heck of a time trying to get a photo of this one...I need to brush up on my photography skills!!

See you soon...

For Baby Sophie!

Our new niece, Sophie, is 6 months old and soon to be christened...this is part of her gift. For some reason dds keep calling her "baby" Sophie instead of just Sophie! Which was cute at first but as she gets older is starting to sound a little strange!!! (Thought you might like a little background on the post title!!!) Anywho...this was heavily inspired by TayloredExpressions on SCS - you can find a link to her blog on the right. It's not a total case because I used different colors, hers said "baby" and I did the bottom a little bit differently but I thank her immensely for this great idea!! I didn't have a shadow box so I left the glass that came in the frame out. I also didn't want to do anything too big since they live in a teeny, tiny apartment in New York City and as you can imagine don't have much room...


I think the frame needs another coat of white (I found this at the $1 store so I really can't complain if I need to fix it up a little) so I'll have to do that very soon!!!
The top is certainly celery paper from SU! (I love that color!!) and I stamped it with paisley (SU!) in certainly celery ink. The patterned paper (I used some!!!) is from a small slab by Provo Craft. The letters are the Sizzix Lollipop Alpha and are mounted on chipboard with more patterned paper! I outlined the flowers with my Sakura Stardust pen. The oval is also mounted on chipboard and the sentiment is from SU! Curvy Verses...of course there are a few jewels on there as well!!!

Have a great week - it's starting to get cold here on the East Coast...does that mean Winter is coming after all??!!! The mild weather was beginning to grow on me...not sure I'll be able to get used the frigid temps again...can you believe we are half way through January already?! Geesh!!

See you soon...


Sunday, January 14, 2007

Inspired by the fan club...

This is a gift for my dh's grandmother, dds' great-grandmother...we didn't see her over the holidays so we're visiting her tomorrow...she's 91! What do you get a 91 year old for Xmas?! When I saw a version of this in the Fan Club Gallery at SCS, I knew I had to case it! If you have access to the gallery you can find it in "The Shape of Things to Come" - last January's gallery. The original is by Pinefeather. I made some changes so its not an exact case but I'm pretty pleased with it. If you don't have access, become a member!!! More info here:
http://www.splitcoaststampers.com/about/fan.php It will be the best money you have ever spent!!!

The base is a prestretched/preprinted canvas that dd found at a discount store...it came with paints and cute picture to paint in...since those paints rarely work she decided to color it with markers and when she was half way through decided to just leave it on the basement floor for several months to get buried under other discarded toys! Well, I went through the basement to clean up this week and decided that I could salvage it into this gift! So, here it is all made over!

First I painted it with a wine colored acrylic paint - two coats. When it was dry I poured some black over the top and then brushed it around and off with a paper towel. Once that was dry I "inked" up my stamp with white paint and a Q-tip and stamped randomly over the surface. I believe Pinefeather used white craft and a much finer lined heart but my white craft doesn't stamp quite so bright so I opted for the paint. The ribbon is SU! organdy and the charm is from the Target $1 spot - last year. I took a quick photo and printed it on my printer...mounted it on black cardstock...I added the spiral clip and a jewelry tag stamped with my 1/8in snap stamps...it still looked a little plain so I made a photo corner, stuck it in my d'vine swirls embossing folder and then outlined the swirls with my Stardust gel pen.

Have a great week...
See you soon...

Thursday, January 11, 2007

Sensational Sand...

that's the title for this weeks "Ways to use it" challenge on SCS found here:
http://www.splitcoaststampers.com/forums/showthread.php?t=213363

to use SU! Sahara Sand (or like color!).


As usual, I don't have the exact color in SU! paper so I used my closest match...it's hard to tell since I stamped right on my card with SU! paisley...I love this background stamp!!
I found my idea for the color combo on this card from the cover of the most recent Pottery Barn catalog! I stamped my paisley in navy on a colonial blue, used plain 'ol brown as my third color. I used the medallion stamp from SU! Gentler Times, stamped it on "sand" and embossed it! I pierced pretty much every layer on this card. The piercings on the blue panel are also outlined with my stardust gel pen. I added some hemp and oh my gosh, I forgot to add some jewels!! Just kidding...didn't think this card called for jewels although I did add a brad in the center of the medallion. The sentiment is from SU! wonderful words II. Used my ever popular slit punch for my corners!! The final outcome has kind of a cowboy feel to it, which was not my intent but it's different and I like it!!

Thanks for stopping by...

See you soon...

Wednesday, January 10, 2007

Combined challenges...

Hi again - ok, so I couldn't resist taking another shot at todays sketch challenge and combining it with yesterdays color challenge! Everything was out and dd#1 was a basketball practice, so why not, right?!

This color combo is growing on me - makes me think of Spring especially since after having such mild weather here in the Northeast we now have frigid temps! I don't have SU! paper in these colors so I matched as close as possible with what I do have...the background is paisley (SU!) and the purple pieces are embossed with my Cuttlebug Happy Birthday folder...the sentiment is by Inkadinkadoo...I pierced the pink scallop and then used my white gel pen around the holes...used my slit punch on just the two corners and added some pink jewels this time! the pink circle is raised as well as the sentiment circle. The green circle is pierced as well. The ribbon is held on with an eyelet that my crop-a-dile for some reason broke! I tried to camaflouge that with yet another jewel!! Not sure if you can tell but I pierced three rows on the right side...each row bigger or smaller, depending on how you look at it, than the other! This was a fun card.
See you soon...

I have a fear...

of patterned paper!!! Not buying it, mind you...using it!!!
This is for todays sketch challenge #106 on SCS found here:


I have tons of patterned paper...I just don't use it. It's so pretty...I guess I feel like if I use it up I either won't be able to find any more like it or well...I don't know why else!!! Usually what happens is when I do use it...and its gone, I forget I even had it!! The things that go on in my head!!! ;-)
I also seem to have a problem when I do decide to use it...even though its patterned...I feel the card looks plain sometimes...like this one. I'm trying to convince myself that it is ok to do simple but it just feels like its missing something...I have ribbon (SU!), I have jewels...I pierced the side...I even added a bracket from my new Cuttlebug alpha - Olivia font in silver paper. The patterned paper is from a Marcella pack that was on clearance at Target...I once again used my slit punch to make ticket corners. The sentiment is from SU! Sincere Salutations.
I hope you are having a good week...
See you soon...

Tuesday, January 9, 2007

Thank you, I think!

This is for todays color challenge on SCS found here:

using pink passion, gable green and lavender lace...

I needed a quick thank you card (for a fellow SCS'er) and this was my closest interpretation of the challenge...since I don't actually have any of those colors in SU! paper. I decided to use a pre-fab card (which I hardly ever do and probably the reason I have a stockpile of them!!) Why is it the "quick" cards always turn into the long drawn out ones?! My initial plan was to marker the flowers by Inkadinkadoo, mount the shimmer paper oval on my lavender and pop dot them with the ribbon tied to the side of the lavender and mount them on the front of the card in the same location they are right now...after stamping the sentiment (a Michaels $1 stamp) I decided it looked too plain so I whipped out my cuttlebug embossing folder, ran it through my sizzix and ugh! it gave my card a distressed look, which is not what I was looking for but waste not, want not!!! Then I decided to mount my focal point on the inside by cutting the same size oval out of the front of the card...the ribbon (Offray/Walmart) was removed and then tied on the front...I also outlined the thank you with my stardust pen...all in all, I guess it's not too bad...it may just be that I'm not used to such a bold colored card...with no layers! It was also very hard to photograph - it always seemed blinding, but finally I found a shot I could live with! Silvia...I hope you like it!!! ;-)
See you soon...

Variation on a theme!

I hope you are enjoying my scarf tutorial and that it is clear and easy to understand! For those of you interested in making something in addition to a scarf or like the idea of having a scarf/belt combo, this is for you!


Rather than using a chunky soup container try instead using a "soup at hand" or other tall container like this:


Same instructions apply but your final piece will be much narrower.

DD is modeling her belt made from one strand of "regular" rainbow yarn...

Note: all kinds of different containers can be used for this craft - just make sure the container is study enough to hold the yarn and that the "hills" are stiff - I tried making a wider scarf for dh with a cool whip (store brand) container and although it was a great size, the container itself was very flimsy and the hills kept bending...needless to say I had an awful time trying to remove the scarf when it was done!

I hope to get back to posting some cards/paper crafts soon...things are busy here and "other stuff" keeps getting in the way of my crafting! I've also just assigned myself the HUGE project of making a heritage scrapbook for my side of the family...my mom brought over two shopping bags of photos, etc yesterday - much more than I ever expected her to have!! What was I thinking?! It will be a slow process but worth it in the end, I'm sure...

The color challenge on SCS is being posted late today so I'm not sure if I'll get to it, but I'll try...today is my day to help at dd#2's brownie meeting...we're making birthday cards for the local convalescent home - boy, my sizzix machine sure does come in handy at times like these!!!

See you soon...


Saturday, January 6, 2007

**Tutorial** Soup Can Scarves

The name is a little misleading as you're not using a "can" but a microwaveable container! This is a craft for just about any age...my ten year old enjoys this as well as my seven year old. The ten year old has made a ton of scarves for herself as well as friends and for donations! If you're quick, you might be able to complete one in a night! So, without further ado...here we go!!


Supplies:
empty microwaveable soup container

yarn - fancy or plain depending on the style you want. (Once you get the hang of it, I recommend using at least two different yarns together for a fuller look)

scissors

craft knife

sharpie
Prep:

1. First, eat the soup and clean the container!

2. Using a sharpie, draw hills and valleys along the top of the inverted container (your bottom will now be your top).

3. Carefully, cut your hills/valleys with a craft knife.


(For teaching purposes I am using regular yarn in my photos...the fancy fur, etc... makes it too difficult to distinguish the stitches in the photos)

Let's begin...

1. Make a slip knot and slide it over one of your hills (leave a tail of approx. 4-5 in.)

2. wrap your yarn around the inside of the next hill,


and then back toward your slip knot (in front of hill) and then to the back again


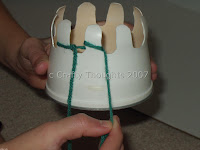
do the same for the rest of the hills.

3. When you reach the hill with your slip knot, complete step 2 as you have been doing- you will now have two strands of yarn on one hill.


4. Assuming you are right handed, keep your yarn in your right hand, pull it aside, and with your left hand, pull your bottom yarn strand over the top of your hill and release.


5. Continue steps 3 and 4 until your scarf reaches your desired length.


Completing your scarf:

1. Once your scarf is long enough, cut your yarn to leave a tail of at least 6-8 in. (Complete your stitches so that there is only one strand of yarn on each hill.


2. Take the strand from your last completed hill and raise it over the top and onto the hill to its left. You will now have one empty hill and one hill with two strands. Continue this step until the scarf is off the container.


3. Run your tail through the stitches to make a knot and keep your scarf from unraveling! You can do the same with your starter tail as well so that both ends are the same...that is up to you.


4. Wear as is or add fringe to the ends.


Fringe:


There are several different ways to do fringe. I still haven't decided on what I like best!


Suggestions: a) Cut 10-20 10in. strands, fold in half, thread through the bottom stitches and pass your strand ends through the fold, pull to tighten. b.) Cut 10 -12 10in. strands - thread them through one or two stitches, make sure strand ends are even and use another piece of yarn to make a tie in the middle.

Note: I just received my Joanns circular - they are having a 4 day sale 1/12 - 1/15 and they are advertising Fun Fur yarn 10 for $10 - that is an awesome deal - the regular price is $3.29 - 4.99!!!!! Other yarns are on sale as well - some brands/styles 2/$5 and others 2/$10


Have fun - happy scarving!!!

(If you have any questions please feel free to send me an email - a link is on the right toward the top of the page! )


Friday, January 5, 2007

A challenge for the New Year

This weeks Limited Supply Challenge on SCS found here: http://www.splitcoaststampers.com/forums/showthread.php?t=211372
is to use something you "obtained" last year but that you have not used yet. Well, there are alot of things that I have not used yet but the first thing that popped into my head was this stamp that is dated 2003 as a limited edition but I don't think I purchased it until 2004! I just took the wrapper off this morning, so I think this qualifies! The only other info on it is "Ana's Basket"...


I stamped the image with brown craft ink and embossed with clear powder...added gold brads to the front, cut primitive hearts (Sizzix) from chipboard and paper, used my crop-o-dile to punch holes in them, adhered a gold eyelet to the red heart (you can't see it but it's there!) and ran gingham ribbon around the basket and through the holes. Attached the hearts to the basket with double-sided tape. Oh, I also brushed the basket with close to cocoa (SU!) ink and cotton ball after embossing. I folded the basket, used double sided tape to keep the sides together (I figure the ribbon will help with that too). I cut my Sizzlit tags from shirt cardboard and paper, inserted another gold eyelet and tied with ribbon to the handle. Sweet is stamped with 1/4 in snap stamps...I stamped each letter separately as "snapped" together they would not have fit. The basket is filled with kisses but as you can probably tell cannot stand on its own...

We have a busy weekend ahead but I plan to have my soup can scarf tutorial up by Monday at the latest...this is my first so bear with me! I hope you are enjoying your visits so far. I'm having fun with it...I hope you are too. Thanks for stopping by. See you soon...

Thursday, January 4, 2007

Successful attempt...

I couldn't stand it any longer...I had to give the foam stamps I posted earlier a whirl! This was the first thing that came to mind when I took these BIG lips out of the bag this morning!

What do you think? It's a big card - still a standard size - but bigger than my usual! It measures 5 x 6.5 in. I consider myself somewhat of a lazy stamper because I don't emboss quite as much as I probably should. These lips just called out for embossing though!! I stamped them in red craft ink, embossed them with clear powder, outlined them with an SU! real red marker cut them out, mounted them on black, cut them out again, outlined the red with my new Sakura clear glitter pen and then mounted them again on white and cut them out...just so they would stand out a little more against the red/black background. They are very shiny and slippery!! :-)
Print Pattern (SU!) is stamped in black on red, used a cotton ball with black ink to soften the edges and then pierced in groups of three. The SWAK is stamped with 1/4 in snap stamps and the circle is mounted on a cuttlebug slider...I used my white gel pen for faux stitching and heart doodles on the black panel. Of course I had to add a jewel or two...one under SWAK and one at the top of the lips...for glisten!!! ;-)
The lips and the slider are popped on leftover stamp rubber.
See you soon...

Enabler Alert!

Have you been to your local Walmart lately?? Have you seen the new foam letters? Well, if not, here they are!


A steal at only 97 cents each!!! I like this font...if you remember, the last batch they had were more along the style of the SU! Monogram stamps. I like these stamps and as you can see bought a bunch...I did the same thing last time...but I really don't use them all that much! I wish I had something to show you but I chucked my first attempt! The main problem is that they are so BIG! No small cards being made with these. They are fun though and my thinking is, you just never know when you might need something like this and for the price, you can't go wrong!!
There are other images in addition to the letters as you can see....lips, heart with arrow, plain heart, an XO together. Fun, fun, fun! Hopefully I will think of something to do with them before the big V day!
Note: I found them at the end of the scrapbooking aisle in my local store...last year they were in the fabric section...so check around, and if you think of a great idea for these humungo letters- let me know!
See you soon...

Wednesday, January 3, 2007

Something different...

Wow, two posts in one day!


This is another for this weeks sketch challenge...I had this idea and wanted to get it onto paper before it went the way of alot of other ideas lately!! I was inspired by SweetMissDaisy (you can find a link to her blog on the right)...a no layer card that looks like layers...at least that is my interpretation of it!

I masked the certainly celery portion using, believe it or not, the thing that comes inside the domino package...I have no idea how to play so I have no idea what it is called or used for but it makes a great mask! I had to raise and lower it to make the area little bigger. I also used a mask to sponge the blue area - not quite the way I wanted it but it will do. I used my speckle stamp on that area too. I stamped the flower and stem from Art of Life (SU!) and added a slider (with a handwritten Hello on it!) - another cuttlebug die and ran some yummy fushia organdy ribbon through it. I found the ribbon at Michaels. I pierced the top and finally used my new Stradust pen on the stem...it doesn't show up too well in the photo...but in certain light it looks pretty cool!

Well, thats all for today - off to bring dd#1 to basketball practice...See you soon...

Bling and a challenge!

BLING!!! I love it!!! This is the "bling" I have been using on most of my cards lately. I found it in Walmart in the bead/jewel/craft section. It is made by Bead Party and it retails here on the east coast for $3.99. The jewels shown here are a pack of clear and blue...they also come in packs of pink and clear. The best part about these is they are self-stick! The worst part is they are tiny and peeling that little sticker off the back without the jewel falling out of your hands a bajillion times can be a chore...but well worth it in the end, I think! (click on the photo for a closer look)


And now on to todays sketch challenge #105! Can you believe it 105?! Wow! The sketch is found here:
http://www.splitcoaststampers.com/forums/showthread.php?t=210663

I used only one stamp on this card! The "Whats New?" sentiment by Hero Arts. The background is done with two different Cuttlebug embossing folders... a regular folder for the semi circle and a mini one for the background. I just embossed, moved it to another location, embossed again and so on. The flowers are Cuttlebug dies as well. They are coming out of a square envelope with petals - a large die from Sizzix. I closed it up with a black grosgrain ribbon and a hat pin. The sentiment is made from circle punches and hangs from jump rings. I again used my slit punch to make ticket corners and doodled tiny flowers in the spaces left behind.
This also fits the bill for this weeks color challenge! Not sure about this one...looks a little busy to me...back to the drawing board to try again!

I wish I could figure out why some photos will open for a closer view and others wont...this one did but then I found something to change and when I went back, it wouldn't open! Ugh...if you know how this happens, I would love some guidance. In the meantime, you can check my gallery on SCS...that should provide a closer/clearer view of the embossing...the link is over there on the right!

See you soon...


Related Posts with Thumbnails